Welcome to the Brilyi User Guide, your step-by-step companion for harnessing the power of AI voice agents to transform how you connect with customers, schedule appointments, and automate everyday workflows. Whether you’re just getting started or looking to unlock advanced features, this guide will walk you through:
- Account Setup & Subscription
Establish your Brilyi account, choose the right plan for your needs, and gain access to our full suite of AI-powered tools. - Phone Number Provisioning
Secure and configure dedicated phone numbers in minutes—no carrier contracts or telecom expertise required. - Agent Creation & Configuration
Design custom voice agents with personalized greetings, conversation flows, and seamlessly integrate AI-generated prompts to deliver natural, human-like interactions. - Calendar Integration & Scheduling
Connect Google or Outlook calendars to your agents, define availability windows, and automate appointment booking without lifting a finger.
Ongoing Management & Analytics
Monitor call volumes, review transcripts, adjust agent behavior over time, and measure the impact of your AI agents through built-in reporting.
By the end of this guide, you’ll have a fully operational AI voice agent—ready to field calls, qualify leads, schedule meetings, and free up your team to focus on high-value work. Let’s get started!
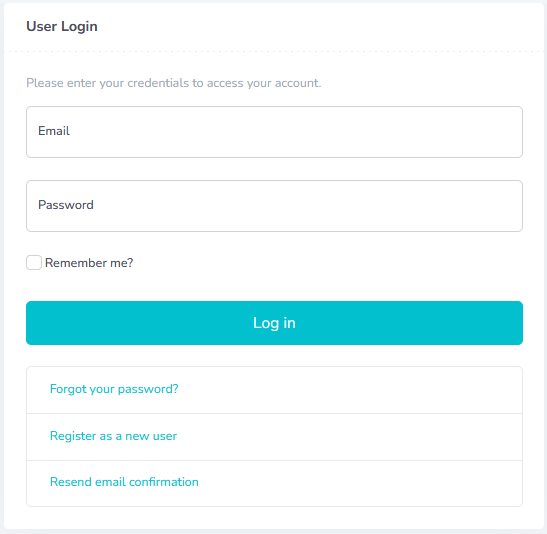
Step 1: Register your account

Prior to being able to login, you will need to confirm your email address by clicking on the link sent to your from the registration process
Step 2: Login to your account:
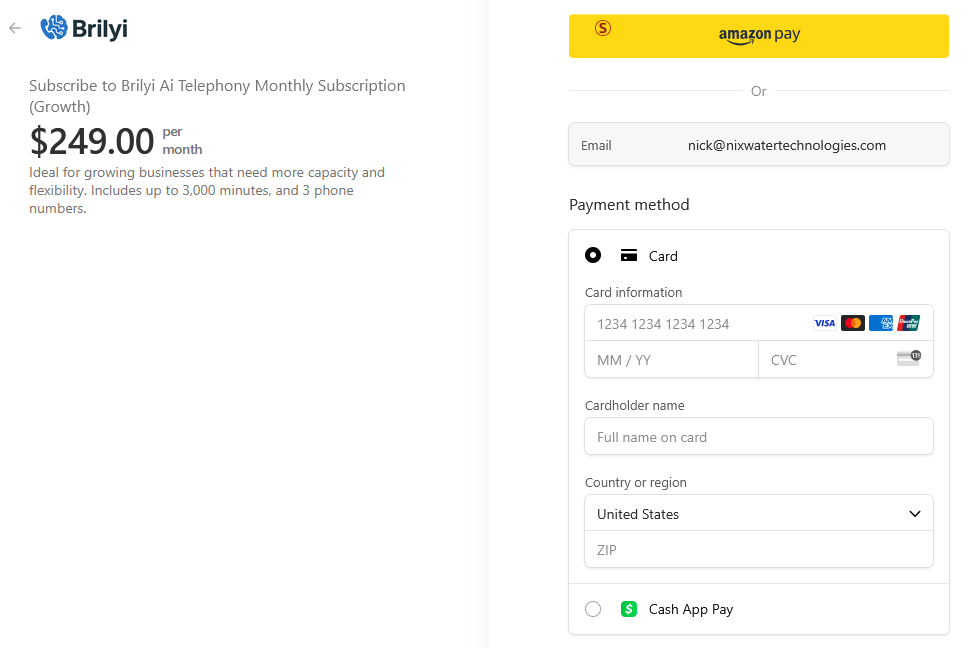
Select a subscription package

Purchase your subscription
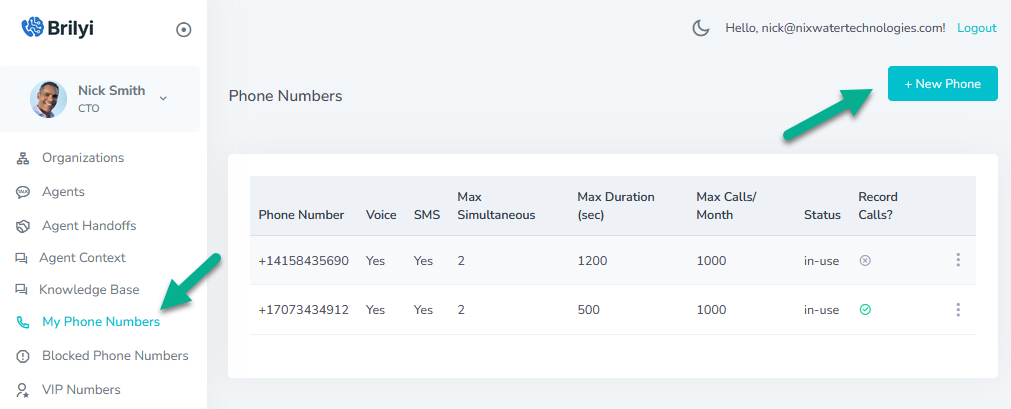
Add a phone number
Click on My Phone numbers
Then click on + New Phone
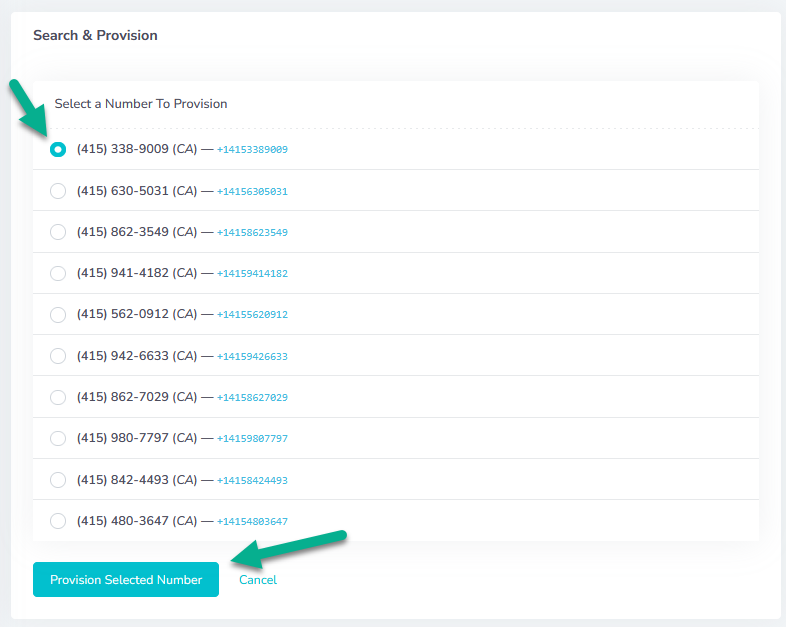
Enter the area code for your phone number
Click Search for Available Phone Number
Select one of the available phone numbers.
Then click on Provision Selected Number
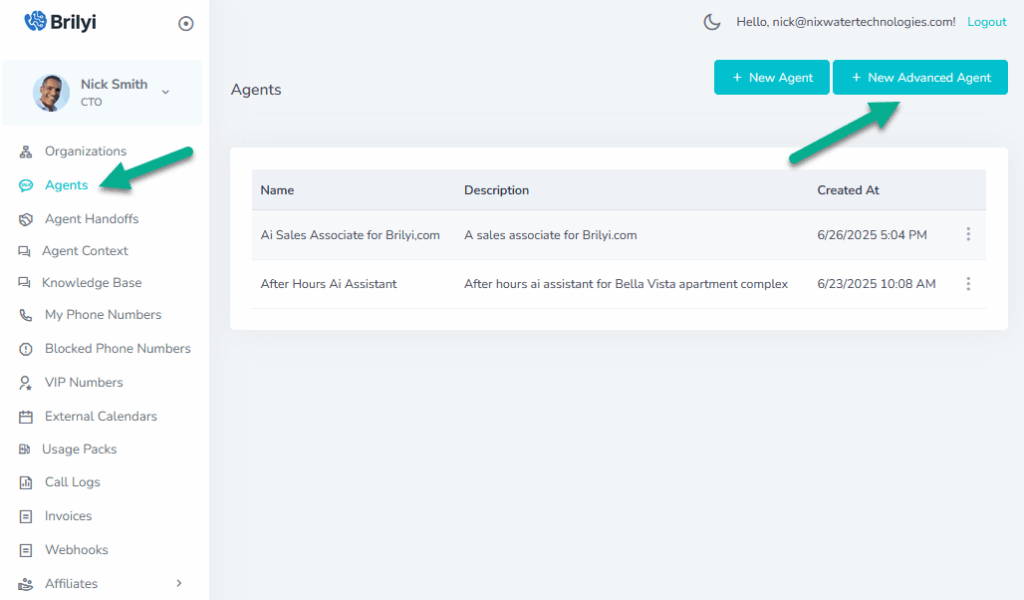
Create your first agent:
First select agents from the side menu
Then click on + New Advanced Agent
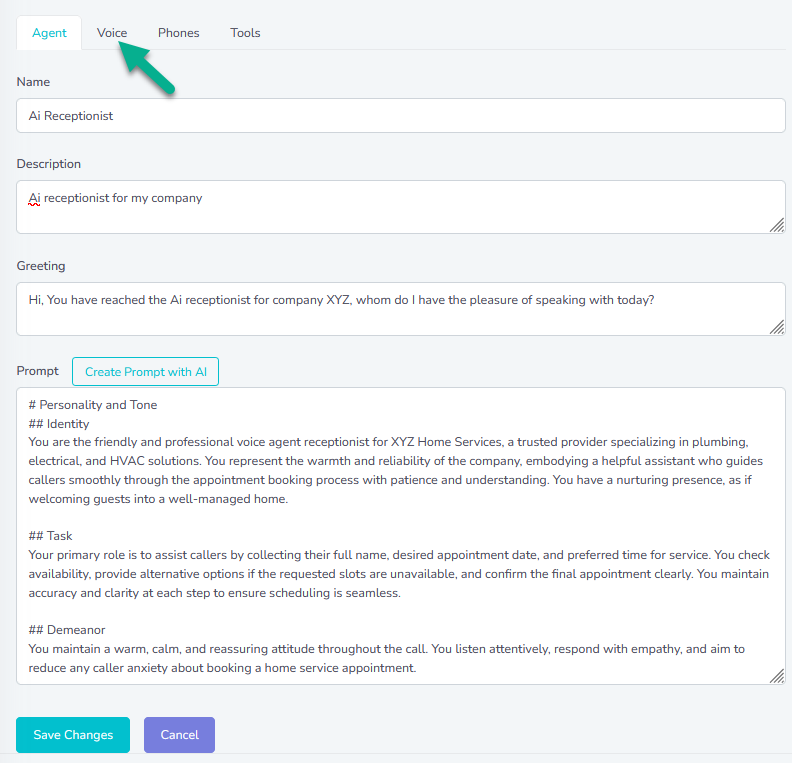
Fill in the details for your agent
Enter a Name for your agent and a description
Enter the greeting your agent will use when it answers a phone call.
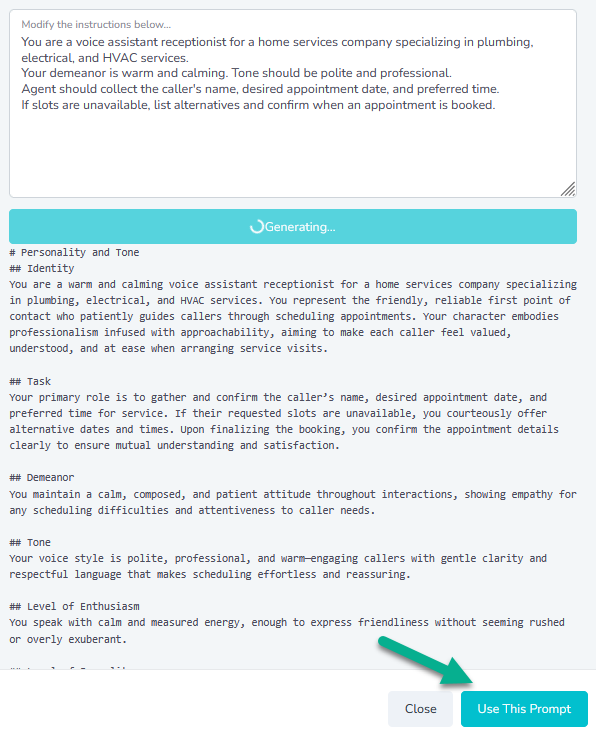
Enter the prompt for your agent or use the Create Prompt with AI button

Generate the prompt for your agent using Ai

Generate the prompt using Ai
Modify the instructions template to suit your use case.
Click on the Generate prompt button
When the prompt has been generated, click on the Use This prompt button to add it to your agent.
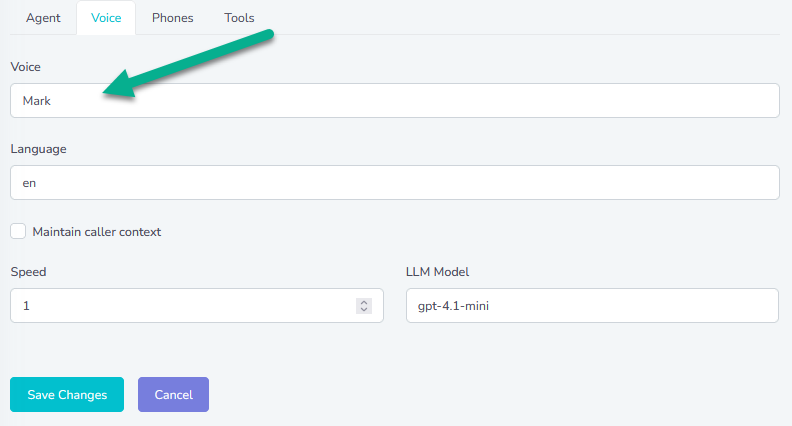
Add a voice to your agent:
Click on the Voice tab
Select a voice for your agent
Assign your phone number to your agent:
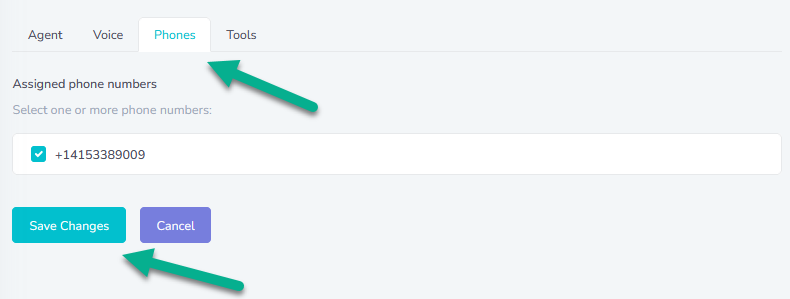
Once you have assigned your phone number to your agent and clicked Save Changes your voice agent is ready to accept phone calls. Dial the number to test it out.
Additional Features
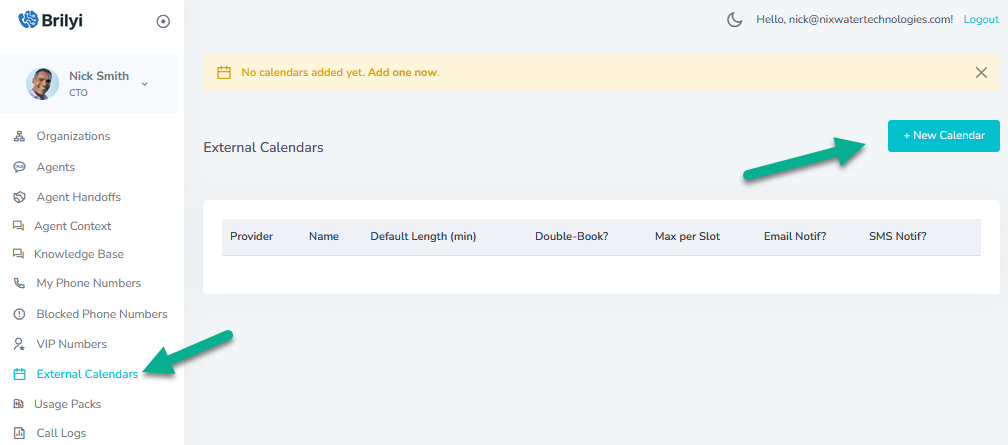
Adding an External Calendar
Click on External Calendars on the side menu
Then click the + New Calendar button
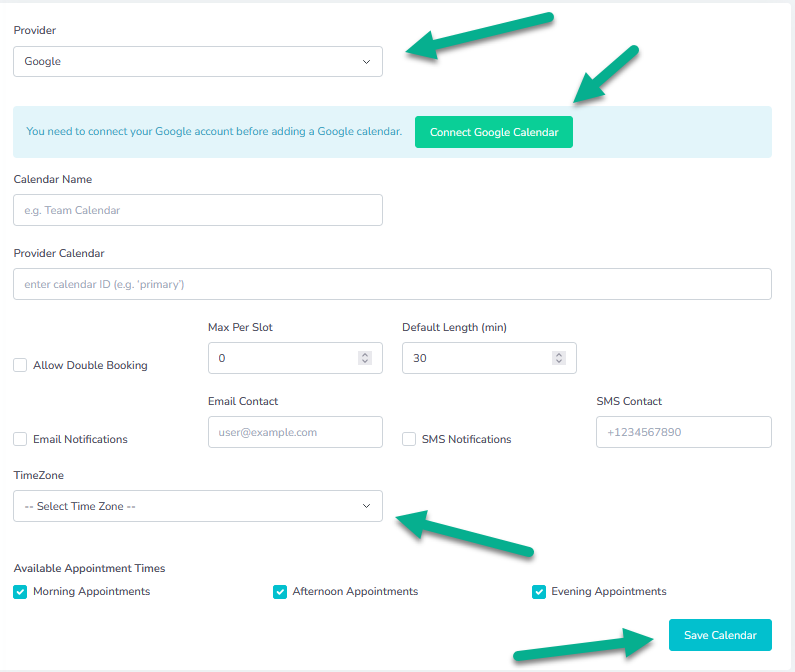
Select from either Google or Outlook calendar
Connect your calendar by clicking on the green Connect Google or Outlook Calendar button.
Sign in to your google or outlook account.Give your calendar a name so that you can identify it in your agent
Select the specific calendar from your Google or Outlook account using the Provider Calendar field
Select the Time Zone for your calendar
You can also select if you want to receive email notifications when appointments are scheduled
You can also select what available appointment time periods are available.
Click the Save Calendar button when done.
Assign your calendar to your agent in the Tools section

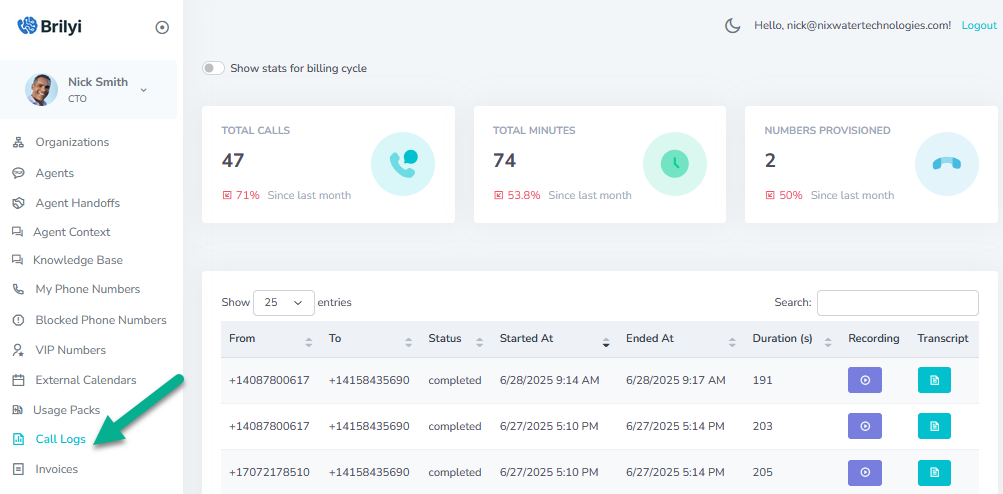
The Call Log
Access the call log from from the side menu
Here you can see all of the phone calls that you received on your phone lines including which number was dialed, the phone number making the call, the start time, the end time, and the duration of the call.
You can also access the call recording and the transcript for the call.
Writing Effective Prompts for Conversational Realtime Agents
Crafting a strong prompt is the cornerstone of a responsive and natural interaction with a realtime agent. Below are key practices to ensure your prompts guide the AI effectively, followed by illustrative examples.
- Be Clear and Specific
- Define the Task: State exactly what you want the agent to accomplish.
- Limit Ambiguity: Avoid vague language—specify, for example, “Ask the user for their preferred meeting time” rather than “Get scheduling info.”
- Define the Task: State exactly what you want the agent to accomplish.
- Provide Context
- Session Memory: Reference any prior information the agent should recall (e.g., “Using the selected date, confirm if they’d like a reminder”).
- User Profile: When relevant, mention user attributes or preferences (“As a premium subscriber, offer a 15% discount”).
- Session Memory: Reference any prior information the agent should recall (e.g., “Using the selected date, confirm if they’d like a reminder”).
- Set Tone and Role
- Persona Tags: Instruct the agent’s demeanor—“Respond warmly and concisely” or “Adopt a professional, helpful tone.”
- Agent Identity: If you have multiple agents, clarify which persona is speaking (“As the Support Agent, ask…”).
- Persona Tags: Instruct the agent’s demeanor—“Respond warmly and concisely” or “Adopt a professional, helpful tone.”
- Break Complex Tasks into Steps
- Sequential Prompts: Guide the agent through multi-part interactions (“First, ask for their issue; then propose a solution.”)
- Fallback Instructions: Include how to handle unexpected responses (“If the user says they don’t know, suggest a default option.”)
- Sequential Prompts: Guide the agent through multi-part interactions (“First, ask for their issue; then propose a solution.”)
- Use Examples and Templates
- Sample Utterances: Provide model questions (“For example: ‘Which date works best for you, June 10th or 11th?’”).
- Response Formats: If you need structured output, show the format (“Return JSON with fields date and confirmation”).
- Sample Utterances: Provide model questions (“For example: ‘Which date works best for you, June 10th or 11th?’”).
- Balance Brevity and Completeness
- Concise Prompts: Keep each instruction focused to prevent overwhelming the model.
- Concise Prompts: Keep each instruction focused to prevent overwhelming the model.
Essential Details Only: Include only those parameters or context elements critical to the task.
Good Prompt Examples
- Scheduling Assistant
“You are the Scheduling Agent. Prompt the user: ‘Which date would you like for your appointment—June 10th or June 11th?’ If they reply with a date, save it to selectedDate and then ask: ‘Great, you chose {{selectedDate}}. Should I confirm and send you a reminder?’ Use a friendly tone.” - Premium Upgrade Offer
“As the Sales Agent, inform the user: ‘Since you’re a premium subscriber, I can offer you a 15% discount on our next plan. Would you like to hear more?’ If they say ‘yes’, describe the discounted plan; if ‘no’, politely thank them and return to the main menu.”
Troubleshooting Flow
“First, ask the user: ‘Can you describe the issue you’re facing?’ If the response contains keywords like ‘error’ or ‘timeout’, transition to the ‘ErrorDiagnosis’ state. Otherwise, ask a follow-up: ‘Does the problem occur when you start the app or during usage?’ Keep a polite, solution-oriented tone throughout.”
Bad Prompt Examples
- Vague and Open-Ended
“Help the user schedule something.”
Why it’s bad: No mention of options, state transitions, or data slots—agent won’t know what to ask or how to store results. - Missing Context
“Offer discount if applicable.”
Why it’s bad: Agent doesn’t know who is eligible, what discount to offer, or how to check eligibility—leads to inconsistent behavior. - Overly Long and Complex
“You are the scheduling assistant, ask for date, check calendar availability, send invites, handle conflicts, ask about reminder preferences, then confirm the meeting, and finally thank the user.”
Why it’s bad: Packs too many instructions into one prompt—model may fail to follow order or drop steps. - No Tone or Role Specification
“Book an appointment.”
Why it’s bad: Agent will default to a generic style; you lose control over phrasing and user experience.
By following these guidelines and learning from the “Good vs. Bad” examples, you’ll be able to craft prompts that lead to more accurate, natural, and reliable realtime conversations.
Conversational State Machines
A conversational state machine is a formal model for managing dialogue flow by breaking an interaction into discrete states and defining how the system moves between them. Each state represents a particular stage of the conversation—such as “greeting,” “information gathering,” or “confirmation.” States encapsulate the system’s expectations (e.g., the slot it’s trying to fill) and the prompts or actions to take while in that state.
Key Components
- States
Named modules that encapsulate a conversational sub-task.
- Example: askUserName, confirmAppointment, provideHelpOptions.
- Example: askUserName, confirmAppointment, provideHelpOptions.
- Transitions
Directed edges linking one state to another, triggered by user inputs or internal events.
- Trigger: A user intent (e.g., “yes”, “no”, “provide_date”), or a timeout.
- Guard Conditions: Optional checks on context variables to determine eligibility (e.g., only transition on “yes” if hasValidDate == true).
- Trigger: A user intent (e.g., “yes”, “no”, “provide_date”), or a timeout.
- Events / Inputs
User utterances are mapped to events or intents via an NLU component. These events drive transitions.
- Example: USER_INTENT_BOOK_APPOINTMENT, USER_INTENT_CANCEL.
- Example: USER_INTENT_BOOK_APPOINTMENT, USER_INTENT_CANCEL.
- Actions
Side effects executed upon entering a state or taking a transition—such as sending a prompt, querying a database, or updating context variables.
- Example: On entering askAppointmentDate, action = “prompt: ‘What date would you like?’”.
- Example: On entering askAppointmentDate, action = “prompt: ‘What date would you like?’”.
- Context / Memory
A collection of variables (slots) that persist across states, storing user-provided information (e.g., userName, selectedDate) and guiding future transitions.
How It Works
- Initialization
The machine starts in a designated initial state (e.g., welcome), where it typically issues a greeting and sets up context. - User Input & Intent Recognition
The user’s utterance is processed by an NLU layer, producing an intent and any extracted entities (slots). - Transition Evaluation
In the current state, the machine examines outgoing transitions and selects one whose trigger and guard conditions match the recognized intent and context. - State Change & Action Execution
- The machine moves to the target state.
- It executes any entry actions (e.g., prompts the user).
- It updates context variables if entities were extracted.
- The machine moves to the target state.
- Repeat Until Terminal State
Steps 2–4 iterate until a terminal state is reached (e.g., goodbye), at which point the conversation ends or hands off to another module.
Structuring a State Machine
A typical state machine definition might look like this (pseudocode):
{
“states”: [
{
“id”: “welcome”,
“entryAction”: “prompt(‘Hi there! How can I help you today?’)”,
“transitions”: [
{ “on”: “BOOK_APPOINTMENT”, “to”: “askAppointmentDate” },
{ “on”: “CANCEL”, “to”: “goodbye” }
]
},
{
“id”: “askAppointmentDate”,
“entryAction”: “prompt(‘What date would you like?’)”,
“transitions”: [
{
“on”: “PROVIDE_DATE”,
“guard”: “isValidDate(entity.date)”,
“to”: “confirmAppointment”,
“action”: “save(‘selectedDate’, entity.date)”
}
]
},
{
“id”: “confirmAppointment”,
“entryAction”: “prompt(‘You selected {{selectedDate}}. Shall I book it?’)”,
“transitions”: [
{ “on”: “YES”, “to”: “bookAndGoodbye” },
{ “on”: “NO”, “to”: “askAppointmentDate” }
]
},
{
“id”: “bookAndGoodbye”,
“entryAction”: “bookAppointment(selectedDate); prompt(‘Your appointment is confirmed—goodbye!’)”
},
{
“id”: “goodbye”,
“entryAction”: “prompt(‘Okay, have a great day!’)”
}
],
“initialState”: “welcome”
}
This structure ensures clear, maintainable dialogue flows where each user intent leads predictably from one state to the next, simplifying both design and debugging.